FLOUNDER IN A CITRUS BEURRE BLANC

29 03 2011

So with my new job teaching landscape design and maintenance, I haven’t had the time (or energy) to do much cooking. But on my way home after work, i walked by a local fish place. It’s a place not known for its quality, and as many of us know, It is easy to mess up fish. So I walked into the seedy establishment, politely declined and walked out – nearly tripping over the welcome mat in the process. But I couldn’t get that smell of fish and shrimp out of my nose.

I came home and immediately took two pieces of flounder out of the Freezer. Soon after, the phrase Beurre Blanc came to the front of my mind. I had recalled seeing a recipe for a piece of cod in a Beurre Blanc and thought to myself, I have to try that sauce. However, I’m not a huge fan of whole cod. Thus began my frantic search for the perfect Beurre Blanc.

Needless to say, the sauce is French. But rumor has it that the origins are a bit of a mistake. A failed attempt at making a Béarnaise sauce resulted in the blessing that loosely translates into “White Butter”. With a name like that, how can you resist? I still don’t understand why the French don’t succumb to heart attacks more often after eating so much butter!

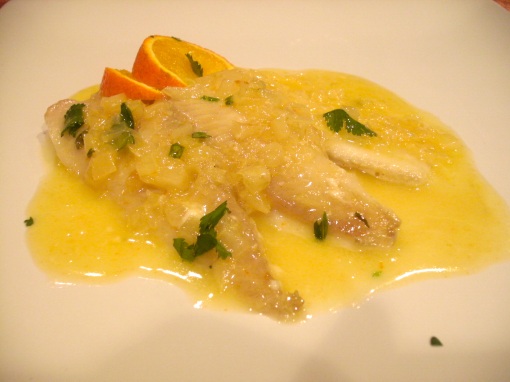
Knowing that I was making fish, i wanted to add a level of citrus but all I had was oranges. So it was decided – an orange-infused Buerre Blanc (with shallots of course), over flounder. Sounds good to me!

I reduced a Moscato white wine with shallots to the point where their was very little liquid left. Moscato was all I had on hand, but it ended up providing a very pleasing sweet quality that complimented the citrus nicely.

After the reduction occurred, I lowered the flame and squeezed a quarter of a medium orange onto the shallots.

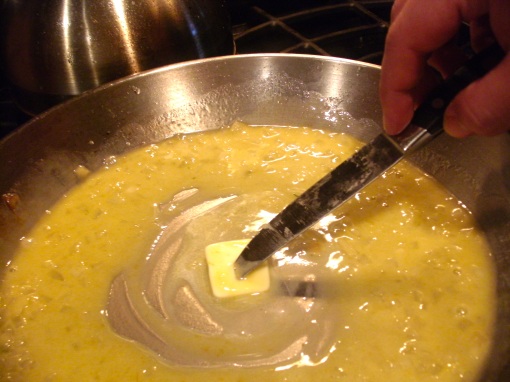
I then added my first of 5 chunks of butter (about 1 1/2 tbsp each). Make sure to slowly melt each chunk before added the next as adding to many chunks of butter can cool the pan to quickly and the emulsion will not occur.

To finish off the sauce I added a the flounder and a little salt. I let the flounder cook and the sauce simmer for a minute or two until the fish turns white. Then I proceeded to dip as many vegetables as I could because i was so rapturously in love with this sauce I almost smeared it all over my face!

BUEN PROVECHO!

Possible Suggestions:

Laying the fish over a bed of spinach, orzo or linguini would be a great way to serve this dish. If you plated this over a pasta, I would suggest adding a little Parmesan cheese and a touch of high-quality Olive Oil.

YOUTUBE UNIVERSITY –

Youtube videos that might help explain the process of making Beurre Blanc

Beurre Blanc for Beginners

Advanced Beurre Blanc


CORN & BLACK BEAN SALAD WITH AN ORANGE & RED WINE VINAIGRETTE

8 02 2011

INGREDIENTS

1/2 cup of Corn (off the cob)

1/2 cup of Black Beans

1/2 cup of Baby Carrots (shaving)

1/2 cup of chopped Cucumbers

1 head of Romaine Lettuce

RED WINE VINAIGRETTE

3 tbsp of Honey (orange blossom honey preferred)

5 tbsp of Orange juice

1/4 cup of Red wine vinegar

1/4 cup of Olive Oil

Salt pepper to taste

RED WINE & ORANGE VINAIGRETTE

Combine honey, orange juice and red wine and whisk thoroughly. Add salt and pepper to taste. Incorporate olive oil into mixture while whisking roughly.

SALAD

Make sure all lettuce is rinsed and cleaned. Biting into a piece of grit or sand is never cute! Chop salad into inch-long pieces. Shave Baby Carrots and chop cucumbers into slices, then quarters. Add corn and rinsed black beans.

Buen Provecho!


SPANISH TORTILLA (Tortilla de Patata)

28 12 2010

5 large eggs

3 medium potatoes, peeled and thinly sliced

1/2 a large onion, finely chopped (sweet vidalia or spanish onion)

Salt to taste

Oil for frying


In a hot saute pan, add onion and potato slices to oil and reduce heat to low. The objective is to cook the potatoes and NOT fry them. This will begin to brake down the starches into sugars and caramelize these sugars slighting.

While the potatoes are cooking, whisk eggs briskly till small peaks start to form, approximately 10 mins. you want to incorporate air into the mixture to keep the dish as light as possible.

When the edges of the potato slices start to lightly brown, remove the potato from the oil and place on a plate lined with a paper towel. Let cool for a few minutes.

Combine Eggs, Onions and Potatoes. let mixture stand for 10 mins.

you have two options at this point. The traditional cooking method (which i recommend) and the simple cooking method for the less adventurous (perhaps less coordinated) cook.


TRADITIONAL METHOD (recommended)

Place mixture in an 10″ frying pan with sloped or curved edges. Cook on low for 15-20 minutes. To flip the tortilla, separate the tortilla from the edge of the pan with a small spatula or knife. place an upside-down plate on top the frying pan. Flip both the plate and the frying pan together so the Tortilla falls out of the frying pan onto the plate. Slide the tortilla back into the frying pan so both sides of the tortilla cooks on both sides. pat the edge of the tortilla so the edge is rounded.


SIMPLE METHOD

Place mixture in an 10” (oven safe) frying pan with sloped or curved edges. Place the frying pan in a 350 degree oven till the tortilla starts to brown. Check the center by inserting a knife or tooth pick into the center of the tortilla. If the utensil comes out clean, then the tortialla is done. slide onto a serving plate.

Buen Provecho!

NOTE:

Traditionally, some sort of white onion is used. However, I experimented with using a Spanish onion. The wine color of the onion creates a very colorful product.

In Spain, the Tortilla de Patata is often placed between two pieces of bread to make a savory sandwich and a popular snack in the middle of the day (siesta) or as a small dinner entrée.F


For those who are visual learners check out this video. I will explain the traditional flipping method pretty well.


CRAB RANGOON

20 12 2010

I swear theirs nothing more cross-cultural in the food world then a morsel of goodness wrapped in dough and fried HARD! Theirs something so appealing, maybe even sensual, about the crunch of a crispy dough and the burst of savory filling that follows. The only difficult choice left to make is what are the appropriate dipping sauces. In this case, I had some Sweet and Sour Sauce left over from a Chinese order I had for lunch the day before. I hate throwing away good dips. This always prompts me to make Crab Rangoon.

While many recipes call for all sorts of extraneous ingredients like garlic power, soy sauce and paprika, I tend to be a purist when it comes to the all mighty Crab Rangoon. Let the simple yet powerful ingredients speak for themselves. Often time the secret to cooking is layering the flavors in multiple steps. I have tried making these with several added spices. They tend to cover the sweetness of the cream cheese. And that is simply a travesty. The strength of Crab Rangoon is in the simplicity of combining the sweet from the cream cheese and the salty/savory of the crab meat. So why muddle it up by adding all kinds of crap!

INGREDIENTS

3 cups of Vegetable oil (for deep frying)

1 pkg of Cream Cheese (at room temp.)

1/3 cup of green onions

1 cup of quality lump Crab meat

1 package of square Wonton wrappers

Salt and pepper to taste

Combine Cream cheese, lump crab meat and green onions in a large bowl. Lay out several wonton wrappers. Place a couple of teaspoons worth of mixture on to each wonton. Now, heres when it gets tricky.

Most Chinese restaurants prefer to close the wonton with the pointed corners looking something like a clover. I find that when you do it this way, cream cheese escapes into the frying oil. To borrow a phrase from Alton, That’s not Good Eats! In fact, in my house, that’s a reason for the fire detectors to go off.

I figure that closing technique works if you’re doing a flash fry in a large professional kitchen. At home, I choose to simply fold them in half. This makes them easy to eat and easier to dip then the clover shape.

Before closing, Wet the edge of the wonton wrapper with water. This help seal the dough. Then its time to fry. Fry till their a nice golden brown and enjoy!


NOTE:

For those who do not have extra Sweet and Sour Sauce just laying around like I did, This is the Best video I could find the demonstrate how to make a basic sauce. Many of the videos you will find use sugar to sweeten the sauce. I really recommend using Pineapple Juice. I would avoid using the pineapple chunks like in this video. Just use the juice.


“HEALTHIER” BROCCOLI BITES

29 11 2010

How can you make fried food healthy? Ok…you can’t! but instead of taking them out of the colorful Friday’s box, we made them from produces we had in the crisper and goodies we had in the pantry.

My roommate is slightly obsessed with fried appetizers. He has a particular fondness for ordering Broccoli Bites and Egg Rolls from the local pizzeria and Chinese place. So in an effort to keep the amounts of processed foods down, while still alowing himself to indulge in his fav fried treats, we perfected a “healthier” broccoli bite recipe.

Ingredients

  • 4 tablespoons Dijon-style mustard
  • 5 tablespoons honey
  • 2 tablespoons of Red Wine Vinaigrette
  • 4 tablespoons of quality olive oil
  • 2 cups broccoli florets
  • 1 cup shredded Cheddar cheese
  • 1 egg
  • 1 cup milk
  • 1/2 cup sifted all-purpose flour
  • 1/2 teaspoon baking powder
  • 1/2 teaspoon salt
  • 1/2 teaspoon vegetable oil
  • 2 cup vegetable oil for frying

Directions

Chop Broccoli (florette and stems) into small pieces. This can be done in a food processor or by hand. However, keep the florettes somewhat recognizable, don’t cut them to small.

In a bowl, Combine chopped Broccoli with cheese and set aside.

In a seperate bowl, combine milk, egg, flour, baking power and salt. Beat till a wet batter is made. Pour batter over vegetables and cheese and mix well.


fill a large sauce pan with vegetable oil. This is going to resemble a deep fryer. The oil should be about an 1 1/2 inch deep. The amount of vegetable oil will really depend on how big your sauce pan is.

using a spoon, drop broccoli and cheese mixture into 375 F degree oil. Fry until lightly golden brown.

Set aside on a paper towel or a strainer (make sure the strainer has a plate under it to catch the oil).

Sauce

combine mustard, honey, red wine vinegar. While stirring briskly, add Olive oil till full incorporated.


Buen Provecho!


Note:

Possible substitutions could be made to enhance this appetizer. For example, substituting cauliflower for broccoli or using a spicy cheese with peppers in it would be amazing.

Don’t over cook, the fritter will continue to darker slightly after being removed from the oil.


THE TURKEY KING

24 11 2010

I called my uncle for advice while looking at a vast bin of large birds for this ever-so-holy foodie holiday. After my uncle Billy cooked the most famous Thanksgiving in my family history,  I have dubbed my uncle the Turkey King. He was nice enough to return the favor by naming me the Turkey Prince. However, you need to know that im slowly pulling up the rear and I’m coming for his title. All kings fall, just remember that Uncle Billy! and while I wish I could post some fancy, exciting and brand new recipe for Thanksgiving Turkey, some classics shouldn’t be tampered with, just perfected!

He divulged his greatest secret to me (big mistake!). No turkey was ever really made most by opening and closing the oven door to baste repeatedly. In effect, changing the temperature so much so, that you add HOURS of cooking time to the process. The great secret to any large piece of poultry is its Brine! Thats right King Billy, its only a matter of time, Im nipping at your heals! This initiated my search for the most amazing brine! But if god is in the details, I needed the holy trinity of brining principals. For this I turn to my favorite technical gastronome, Alton Brown!

Diagram of Salt (NaCl) traveling through the cell wall

Essentially a brine plays on the basic principal of Osmosis. Water has a need to spread into areas with less density or concentration of water molecules. By immersing the meat in a salt bath, the phospholipid bilayer that makes up the skin begins to allow for the transference of water, thus allowing elements of flavor to seep into the meat at a cellular level. So I created a brine infused with a large array of vegetables, Herbs and Spices. The result was a bird so moist that two seperate self-confessed turkey haters, loved my version! Buen Provecho!

I'm coming for the Throne!


While I would love to pretend I could explain it better then Alton Brown, I simply can’t. So I have included several videos of his doing almost exactly what I did.


The Alton Brown Brine Voodoo Magic!!!


Video 1 & 2 of Alton’s method of Bird Baking!


Directions (Courtesy of the Food Network)

For the brine:

  • 1 cup kosher salt
  • 1/2 cup light brown sugar
  • 1 gallon vegetable stock
  • 1 tablespoon black peppercorns
  • 1 1/2 teaspoons allspice berries
  • 1 1/2 teaspoons chopped candied ginger
  • 1 gallon heavily iced water

For the aromatics:

  • 1 red apple, sliced
  • 1/2 onion, sliced
  • cinnamon stick
  • 1 cup water
  • 4 sprigs rosemary
  • 6-10 leaves sage
  • 10-15 sprigs Parsley
  • Canola oil

Directions:

2 to 3 days before roasting:

Begin thawing the turkey in the refrigerator or in a cooler kept at 38 degrees F.

Combine the vegetable stock, salt, brown sugar, peppercorns, allspice berries, and candied ginger in a large stockpot over medium-high heat. Stir occasionally to dissolve solids and bring to a boil. Then remove the brine from the heat, cool to room temperature, and refrigerate.

the night before you’d like to eat: Combine the brine, water and ice in the 5-gallon bucket. Place the thawed turkey (with innards removed) breast side down in brine. If necessary, weigh down the bird to ensure it is fully immersed, cover, and refrigerate or set in cool area I placed it outside on my back porch (covered tightly of course) for 8 to 16 hours, turning the bird once half way through brining.

Preheat the oven to 500 degrees F. Remove the bird from brine and rinse inside and out with cold water. Discard the brine.

Place the bird on roasting rack inside a half sheet pan and pat dry with paper towels.

Combine the apple, onion, cinnamon stick, and 1 cup of water in a microwave safe dish and microwave on high for 5 minutes. Add steeped aromatics to the turkey’s cavity along with the rosemary and sage. Tuck the wings underneath the bird and coat the skinliberally with canola oil (SEE ORIGINAL NOTES BELOW).

Roast the turkey on lowest level of the oven at 500 degrees F for 30 minutes. Insert a probe thermometer into thickest part of the breast and reduce the oven temperature to 350 degrees F. Set the thermometer alarm (if available) to 161 degrees F. A 14 to 16 pound bird should require a total of 2 to 2 1/2 hours of roasting. Let the turkey rest, loosely covered with foil or a large mixing bowl for 15 minutes before carving.


Original Notes:

Before placing in the over, I rub the entire bird in a mixture of Oil, Garlic, Butter, Sazon (a Spanish spice known for it orange-red color, similar to saffron) and Adobo, and Herbs! I borrowed this step from the process of making a Spanish Roast Pork (Pernil).


SHRIMP CEVICHE

12 11 2010

2 large Peppers
2 cloves of Garlic
1½ lbs of raw Shrimp (peeled, deveined and roughly chopped)
4 large Shallots
¾ cup of Lemon Juice
¾ cup of Lime Juice
½ cup of Red Wine Vinegar
¼ cup of quality Olive Oil
¼ cup of diced Cucumber
½ cup of quartered Cherry Tomatoes
Salt and pepper to taste
1/3 cup of finely chopped Parsley
1/3 cup of finely chopped Cilantro
Optional
1 peeled Orange (separate segments and cut into thirds)
1/3 cup of chopped Mint
Plantain chips
Tortilla chips
    Peel and devein raw shrimp (including tails). Mix shrimp with lemon and lime, juice and vinegar. Gently salt and pepper. Mix to combine. Cover with a plastic wrap so that there is no air between the mixture and plastic wrap. Refrigerate for no less the 3 hours. Shrimp should have turned slightly white and pink.Combine shrimp mixture with peppers, garlic, shallots, olive oil, cucumbers, tomatoes, parsley and cilantro. Also combine any optional fruits or vegetables. Salt and pepper to taste. 

    Suggestion:

    An amazing accompaniment to any ceviche is home-fried tortilla chips. Purchase a package of flour tortilla. I find the 8” flour tortilla makes great sized chips. Slice the chips into quarters and fry till golden brown. I find that 10”-12”  flour tortillas also work. Just cut into eighths. Salt and peppers directly after frying. These make the best method of transportation from plate to mouth for any ceviche

    I highly recommend using Plantain chips to slop up all the lemony deliciousness.

    Note:

    Should someone be allergic to shrimp, It’s worth NOT multitasking while making any ceviche as to not cross contaminate other dishes. The last thing you want is to contaminate any other food with the oils from the shrimp. Then it will be a night spent in the ER, instead of a night spent drinking!!!

    I say the more lemon or lime juice the better. I’m ok if the ceviche is a little soupy. Having more juice is better then not having enough. You can plate it as wet as you like it.


SAMOSA RICE: Deconstructing Samosa into a beautiful rice dish

2 11 2010
Samosa: Inspiration for my Indian style rice dish

Theirs something about stuffing a pastry with savory goodness that crosses cultures and speaks to something innate with us all. Whether you steam a dumpling or fry an empanada, one thing is clear, the method of packaging any savory delight, rich in flavor, in a carbohydrate goodness is a winning a combination.

While I make empanadas very often. I call them the “Puerto Rican Hot Pocket”. The other day I was reminded of my other favorite fried carbohydrate delight, the Indian version of Emapanadas, the Samosa.

The normal combination for my empanadas would be rice and beans. However, I didn’t have beans so I went ahead with the empanadas but I had to improvise a new rice recipe. So I decided to deconstruct a Samosa filling and combine it with rice.

I cup of Short Grain Rice

2 cups of Chicken Broth (Water is possible substitute)

1/2 cup green Peas, cooked

1 tsp Garam Masala

1 medium Onion, finely chopped

1/2 tsp Red chili powder

1 tsp Cumin Seed

1/2 tsp Coriander powder

1 finely chopped Green Chili

1/3 cup of chopped Parsley

1/3 cup of chopped Cilantro

1 tsp Dry Mango Powder or Amchur (optional)

1 lb of ground beef (optional)

Sauté half of your Onions in a quality olive oil (lightly salted) until translucent and lightly browned. If you’re opting to add ground beef, now would be the time to brown the beef in the caramelized onions. Salt and pepper to taste.  Drain off excess oil or fat and set aside.

Sauté the second half of your Onions in a quality olive oil (lightly salted) until browned. Add Cumin seed, Peas, Garam Masala, Coriander powder, Chili Powder, dry Mango Powder (optional) and a pinch of salt and pepper to taste.  Continue to sauté for another 2-4 mins.

Combine rice and Ground beef into sautéed mixture. Add Chicken Broth. Bring to Boil, reduce heat and   Simmer for 20 mins. Add Parsley, Cilantro and Butter.  Salt and pepper to taste.

Note:

If your interested in the recipe and process for the original Samosa, this would be an good resource for you


GRILLED HAM, BRIE, APPLES AND APRICOT SANDWICH WITH ARUGULA

26 10 2010

This is a spin on a sandwich I had at a cafe which later became this inspiration for the post “Where Have All The Cafes Gone?”

  • 1 Ciabatta bun.
  • 5 to 6 tablespoons unsalted butter, softened
  • 1/4 cup store-bought apricot preserve (possible substitute – fig preserve)
  • 4 tablespoons of good quality honey
  • 1 pound sliced fresh roasted deli ham (possible substitute – turkey)
  • 1/2 pound brie cheese, thickly sliced
  • 1 bunch arugula, stems trimmed (optional)

Start by mixing both honey and apricot preserve. Cut Ciabatta bun lengthwise and apply Honey-apricot mixture to both inside portions of bread. Layer several slices of deli ham, sliced brie, then granny smith apples. Add a drizzle of apricot preserve on top of the apples. Apply top layer of Deli ham. Arrange 2 to 3 arugula leaves on top (optional). Spread butter on the outer parts of the ciabatta.

Heat a large cast-iron or other heavy skillet over medium-low heat. Add the remaining 1 tablespoon butter and let it melt to evenly coat the bottom of the pan. Add as many sandwiches as will comfortably fit (either 2 or 4) and cook 2 to 3 minutes until the bread is golden brown and the cheese begins to melt. Flip and cook 2 to 3 more minutes to brown the bread. (Add another tablespoon of butter and cook the remaining sandwiches, if you need to.) Cut the sandwiches in half and serve hot.


MACARONI AND FOUR CHEESE WITH BACON

12 10 2010

  • 1 box (1 lb) cavatappi
  • 6 slices of bacon, diced
  • 2 tablespoon unsalted butter
  • 3 tablespoons all-purpose flour
  • 2 cups 2% milk
  • ¼ cup of onion, diced fine
  • 1 cup shredded sharp cheddar cheese
  • 1 cup shredded mozzarella cheese
  • 1 cup shredded fontina cheese
  • 1 cup of Parmesan-reggiano
  • 1 cup panko bread crumbs

Heat oven to 350 degrees. Coat a broiler safe baking dish with a nonstick cooking spray. Bring a large pot of lightly salted water to boil.

Cook Cavatappi for 7 minutes in boiling water, then drain.  Make sure Cavatappi is very al dente because it will continue to cook in the oven. Meanwhile, In a medium size sauce pan coon bacon over medium heat until crispy, 6 minutes. Transfer to a paper towel. Carefully pour off drippings but save 4tablespoons to the pan. Add butter

Add onion and sauté till translucent, 3 minutes. Whisk in flour until smooth. In a thin stream, whisk in milk. Add salt and pepper to taste. Bring to a slight boil over medium heat and then reduce heat and simmer for 2 minutes.

Remove milk mixture from heat; whisk in Cheddar, Mozzarella, Fontina and ½ cup of parmesan cheese. Stir till cheese is completely incorporated into milk mixture. Toss bacon pieces with cheese mixture. Mix remain ½ cup of parmesan with panko bread crumbs and set aside for topping.

In the pasta pot, combine cooked pasta and cheese sauce. Fill prepared dish and cover with Parmesan-panko bread crumb topping. Place a couple of small pieces of butter on the parmesan-panko crust to help the panko brown. Bake at 350 degrees for 20 minutes. Increase temperature to broil and broil for 3 minutes or until crust and golden brown. Cool slightly before serving.

Buen provecho !